Show notes are at https://stevelitchfield.com/sshow/chat.html
…
continue reading
Content provided by Dustin Stelzer. All podcast content including episodes, graphics, and podcast descriptions are uploaded and provided directly by Dustin Stelzer or their podcast platform partner. If you believe someone is using your copyrighted work without your permission, you can follow the process outlined here https://player.fm/legal.
Similar to Electrician U
Embedded is the show for people who love gadgets. Making them, breaking them, and everything in between. Weekly interviews with engineers, educators, and enthusiasts. Find the show, blog, and more at embedded.fm.
…
continue reading
Kick off your week every Monday morning by discovering new strategies to dominate your day before breakfast! Join host Jeff Sanders on this practical self-improvement podcast that focuses on productivity, healthy habits, and personal development. This is your home to bounce out of bed with enthusiasm, create powerful lifelong habits, and tackle your grandest goals with extraordinary energy! To join The 5 AM Miracle Community, get email updates, see recommended tools, and dig into the show no ...
…
continue reading
Interesting stories from today’s franchisors and entrepreneurs.
…
continue reading
Survivalist Prepper, all about survival skills, prepping, preparedness and living off the grid without too much “tin foil hat” stuff. Learning how to become more self sufficient when disaster strikes. Stay up to date with the latest prepping news and information like bugging out, prepping and survival gear, and food storage etc.
…
continue reading
1
The Brutal Truth about Sales and Selling - We interview the world's best B2B Enterprise salespeople.
Brian Burns
No BS Allowed - Are you sick of empty suits telling you to work harder? - Learn about The Maverick Selling Method, which models the world's best salespeople and what they do differently. If you are in sales and are passionate about selling, you will like this podcast. The focus is on b2b sales and selling. If you are selling or in sales, this podcast is for you. I cover cold calling, spin selling, challenger sale, solution selling, and advanced selling skills. Strategic selling, LinkedIn, sa ...
…
continue reading
BBC Radio 5 live’s award winning gaming podcast, discussing the world of video games and games culture.
…
continue reading
The London School of Economics and Political Science public events podcast series is a platform for thought, ideas and lively debate where you can hear from some of the world's leading thinkers. Listen to more than 200 new episodes every year.
…
continue reading
Mandarin Chinese Mp3 Audio Lessons, PDF Transcripts, Worksheets, Situational Dialogues and Chinese Character Videos
…
continue reading
Player FM - Podcast App
Go offline with the Player FM app!
Go offline with the Player FM app!

))
Terminating/Testing Network Cables - CAT 3, CAT5, CAT6, CAT 7, CAT 8
Archived series ("Inactive feed" status)
When?
This feed was archived on October 12, 2020 12:11 (
Why? Inactive feed status. Our servers were unable to retrieve a valid podcast feed for a sustained period.
What now? You might be able to find a more up-to-date version using the search function. This series will no longer be checked for updates. If you believe this to be in error, please check if the publisher's feed link below is valid and contact support to request the feed be restored or if you have any other concerns about this.
Manage episode 244087729 series 2309681
Content provided by Dustin Stelzer. All podcast content including episodes, graphics, and podcast descriptions are uploaded and provided directly by Dustin Stelzer or their podcast platform partner. If you believe someone is using your copyrighted work without your permission, you can follow the process outlined here https://player.fm/legal.

In partnership with Rogers - https://www.rogersservices.com
Punching down and testing cat5 cables is something that a lot of people struggle with understanding so today I'm going to talk about what the various category cables are, how to decide if you need A or B configuration, and how to check your terminations with a tester when you're done.
WHAT IS CATEGORY CABLE?

Category 5 cable is probably the most commonly know network cable. It's only one of the many kinds out there, however. There are others like Category 3, Cat 5, Cat 5e, Cat 6, Cat 6a, Cat 7, and even the new Cat 8. Category cables are simply twisted pair cable assemblies that have 4 pairs of conductors - 8 total wires inside. Each pair is color-coded to allow the installer to see which pairs they're dealing with when making terminations.
The colors for terminating are made up of 4 solid colored conductors, and 4 striped. Each solid-colored conductor has a matching color striped conductor that are twisted together with inside of the jacketing. Some of these cables are shielded, and some are unshielded and depending on the environment you’re in you may need to know whether you need one or the other.
Each pair has a specific purpose in how they send and receive signals, and when punching down keystone jacks and crimping RJ45 connectors you need to know the order they're supposed to go to ensure the cables work correctly.
568A or 568B?
Every termination we do nowadays has two options for how the wires can be ordered. The old way of wiring was using the T568A configuration. These days most people use the T568B configuration, and there's a reason for it.

A straight-through cable will have one configuration on both ends of the cable. This means that on one side you'll have A, and the other you'll have A. This allows information to be passed "straight through" the cable for devices that are DIFFERENT than one-another. If you wire for configuration B, the same is true. The reason there are 2 configurations is that there is a type of network cable called a "crossover cable" that needs to be able to be visibly recognized when looking at it. This type of cable has ONE side using an A configuration, while the other has a B configuration. This allows two SIMILAR devices to speak to each other, and listen to each other at the same time.
If you try to use a crossover cable for 2 different devices it will not work, and if you try to use a straight-through cable for 2 similar devices it will not work. Each has their purpose. However, whether or not you use A or B configuration, your cables will still work if you make sure both ends are the same. Crossover cables are very rare and are used specifically by people who know why they're using them. For the average person, wiring a cable with both ends as A, while hooking up to a network that is wired in B is ok. All of the pins will still line up allowing different devices to communicate. It's only a problem when the pins differ on both ends or are punched down/terminated incorrectly.
TERMINATING RJ45 CONNECTORS
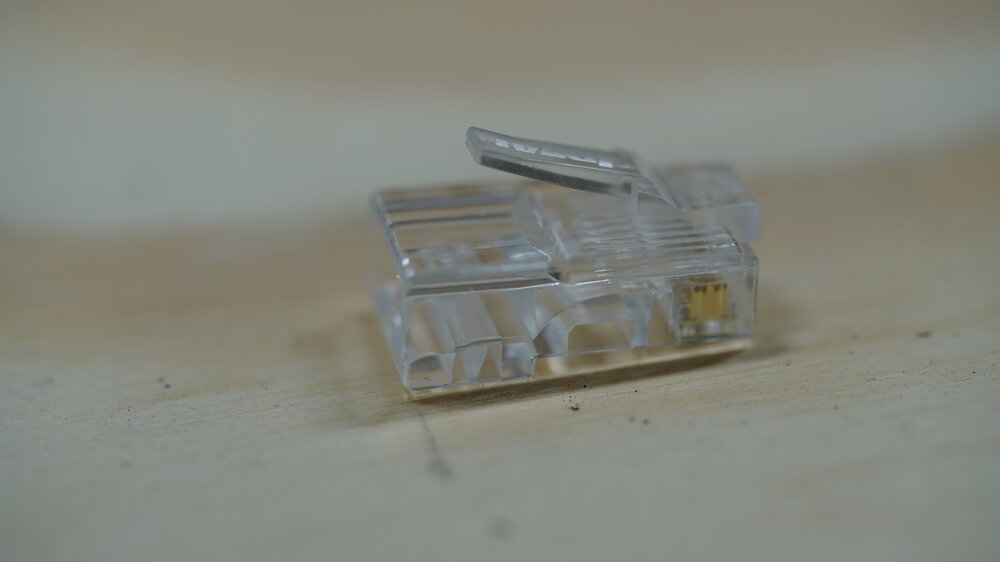
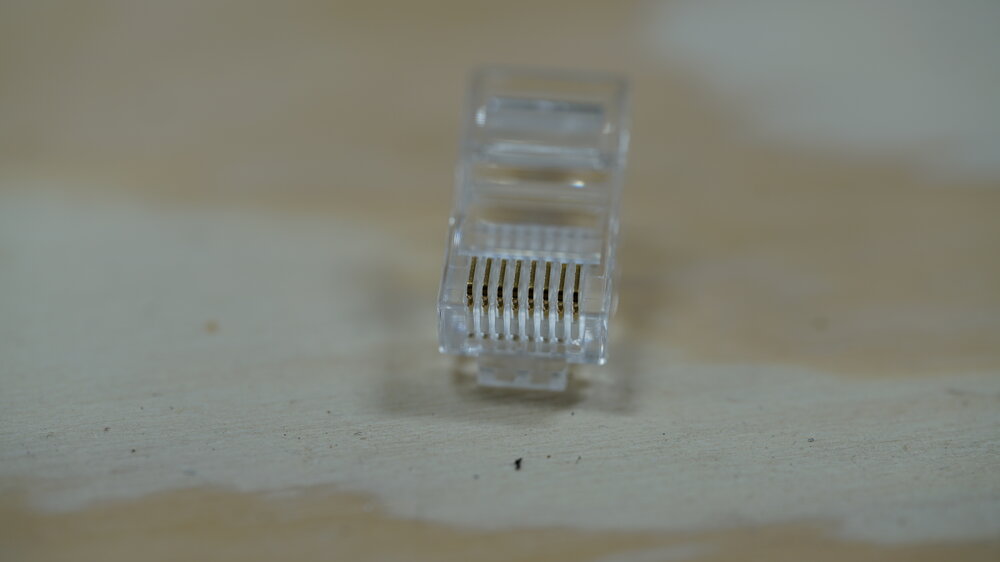
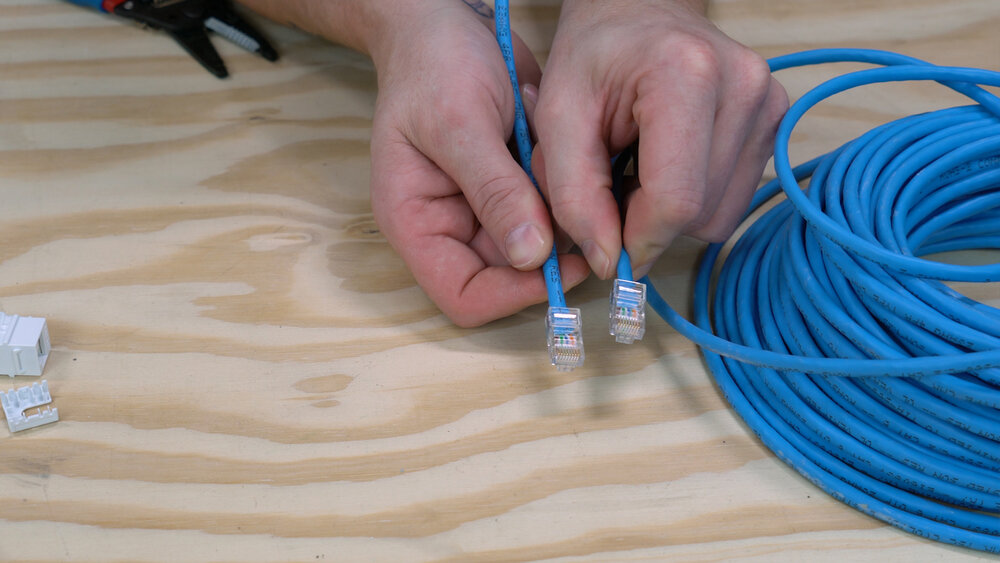
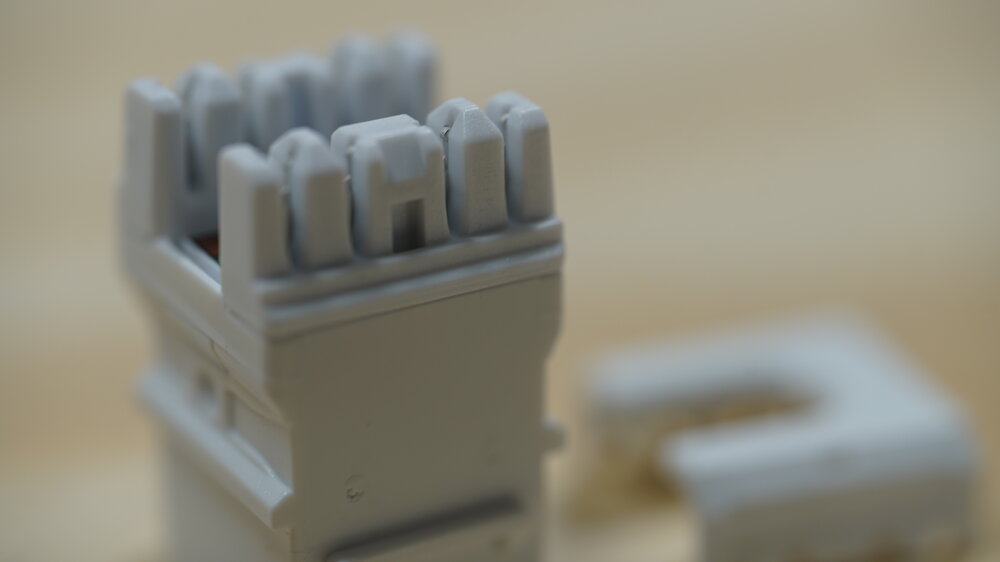
An RJ45 connector is the "male" end of a cable that plugs into the "female" keystone jack. An RJ45 has 8 metal pins that pierce the sheathing of the 8 individual wires in the CAT cable assembly. These pins have a specific order that must be followed to ensure they transmit and receive data, otherwise, they won't work or they'll short-out your equipment.
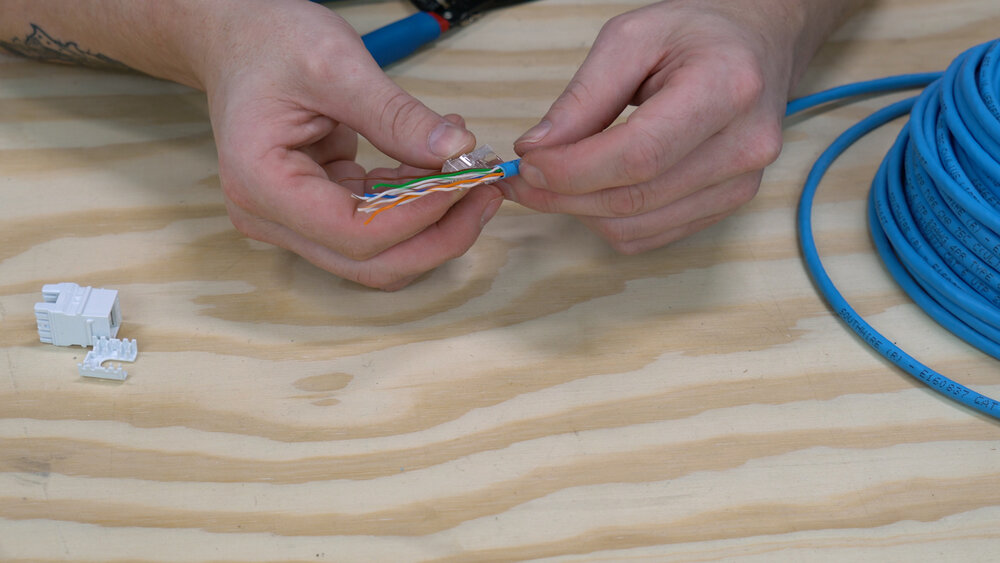
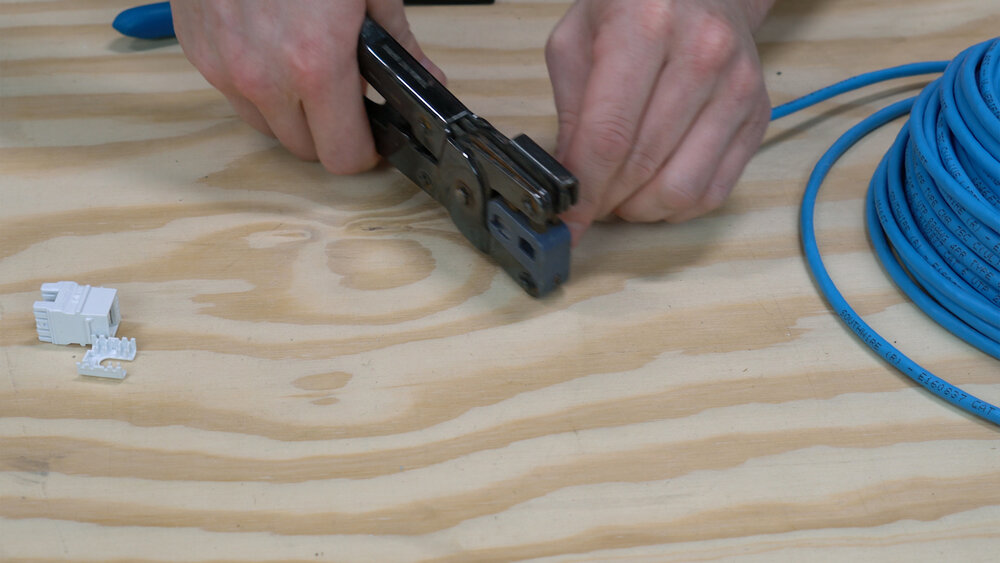
Strip out about 3 inches of jacketing at the end of the cable. Cut off any plastic insulation, or fibers that come on the inside of the cable. Next untwist all of the pairs and straighten them out using something solid. I drag the edge of my strippers down each conductor to remove the curls in each one. Then line each conductor up in either the A or B configuration from LEFT TO RIGHT as they emerge from the jacketing. Next, take your RJ45 connector and measure out how much of the conductors you need, and cut off the excess. You should only need roughly 1/2-inch to 3/8-inch of conductors sticking out of the jacketing. Make sure you don't mix up the order as you're cutting. Then slide the RJ45 connector so the bottom is looking at you. The "TOP" of the RJ45 that has the thumb clip must face down/away from you. Once you've gotten it slid in place, use a crimper to crimp down the connection. This does two things - first it smashes a piece of plastic down on the inside of the connector, which holds the entire connector down on the jacketing. Second it presses each of the 8 pins in to the 8 conductors allowing a connection to occur when the cable is plugged in.
Last thing to do is visually inspect each conductor to make sure that all of the pins are in the correct order, especially on both ends if you have a cable that you’ve just terminated on both sides. Further down in this article we will get to testing which is the most important step in all of this.
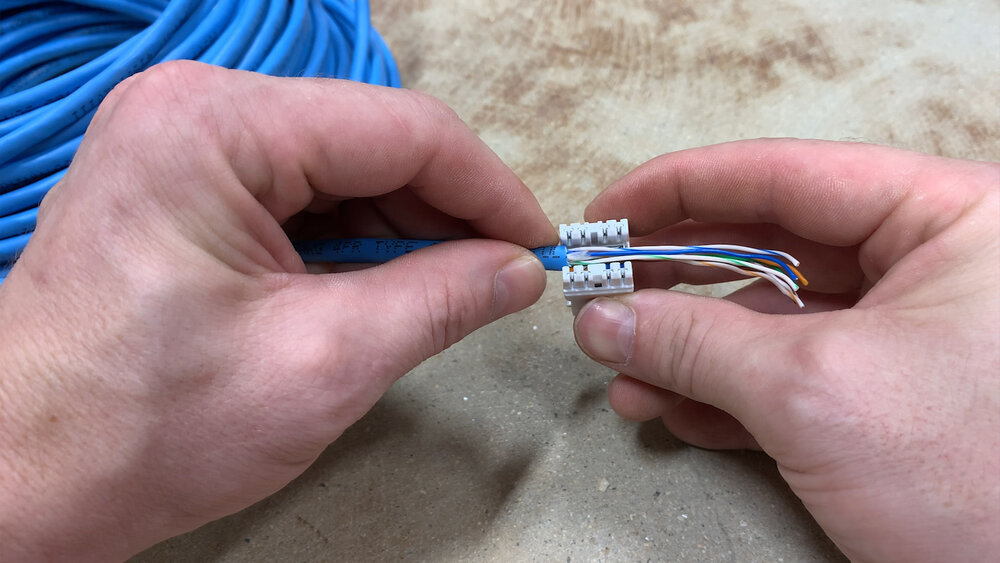
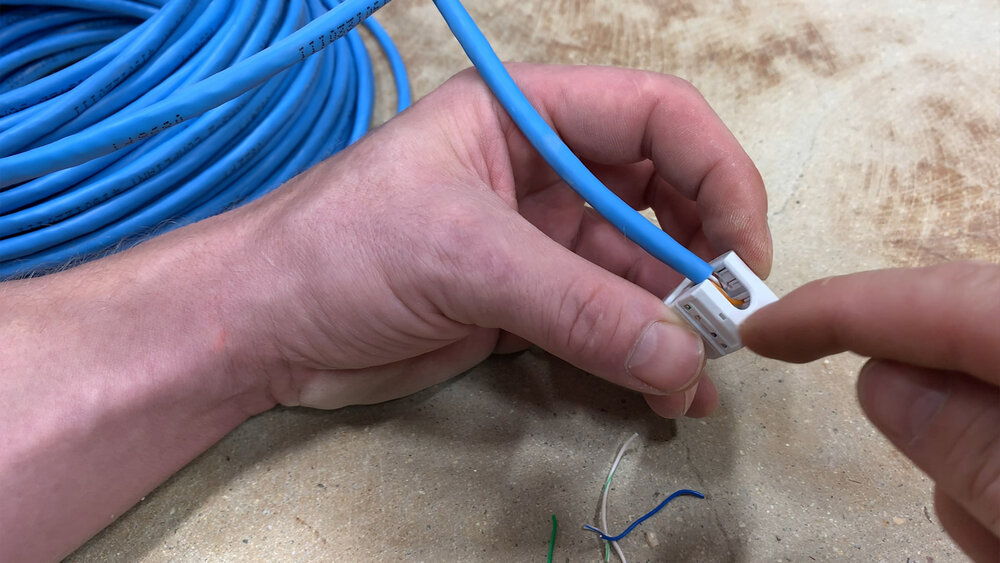
TERMINATING KEYSTONE JACKS
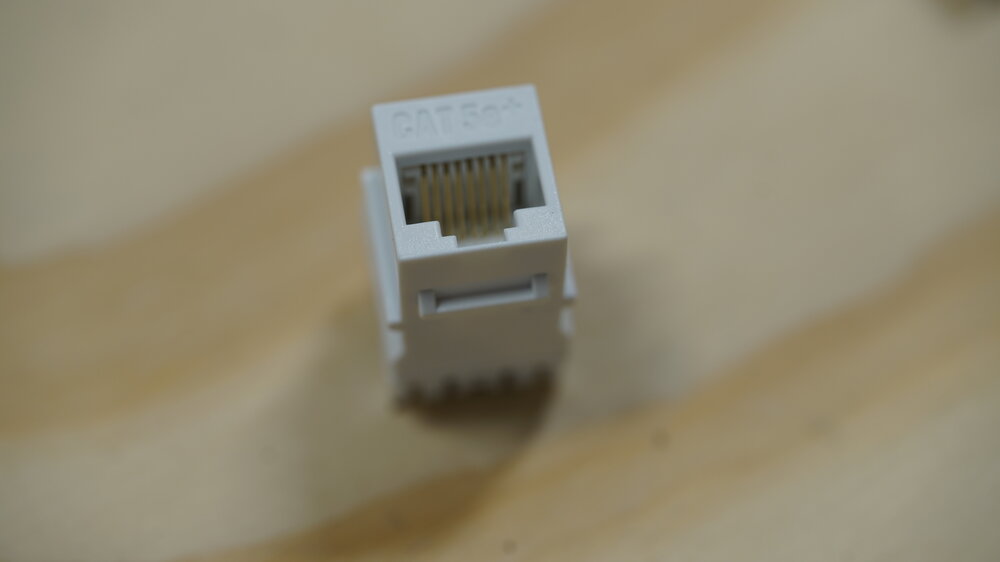
To terminate a keystone jack you have to flip it upside down to expose the blades on the bottom. All modern keystones will come with a wiring diagram that shows you which pins to match with which colors for both T568A and T568B terminations. Make sure you keep your eye on which order you’re doing, as sometimes it gets confusing looking at these tiny stickers.
First strip out 3 inches of jacketing from the end of the cable, just like we did on the RJ45 connector above. Untwist the pairs and straighten them out so they’re easier to work with. Lay the conductors across the keystone so that the jacketing is just inside of the connector. This ensures no conductors will become exposed when you finish your terminations.
Next use your punchdown tool to press each conductor into its slot. If you set your punchdown tool to “LOW” it will not punch very hard, and most of the time you’ll have to twist off the ends after you’ve punched them down. If you use “HIGH” the ends will come flying off as you punch them down, so a lot of people like using this setting. If you’re in an environment where you can’t send the ends flying several feet away (above someones clean desk) you may want to stick to low.

After punching down all of the conductors go back and check to make sure you matched the colors up correctly. Then snap the plastic cover on the back side of the connector and voila, you’re done.
TESTING YOUR TERMINATIONS
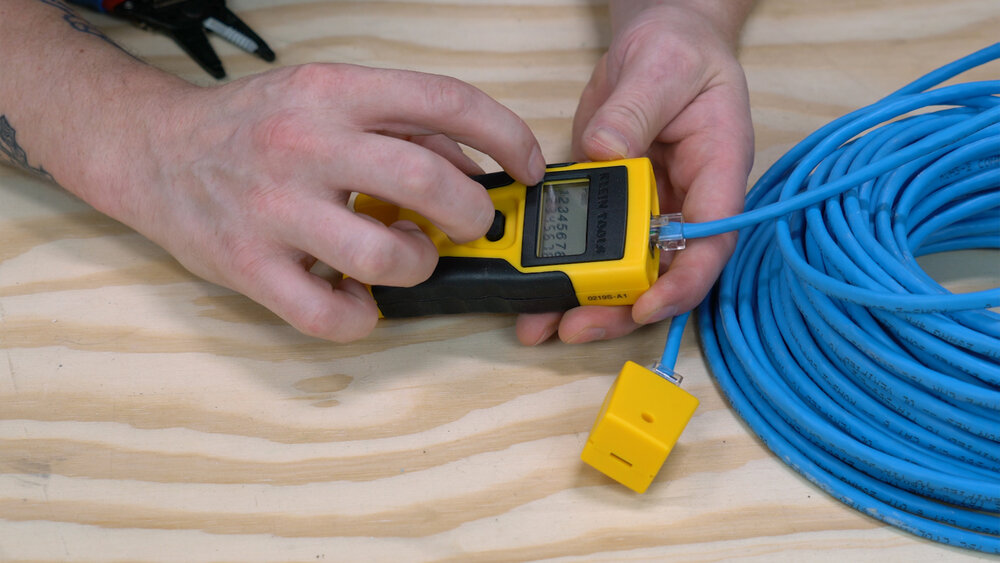
A single tester can be used to check both RJ45 and keystone terminations. You will need a small patch cord to use if you have a tester that did not come with such jumpers. You can always make a couple of these, I just happen to have a few that I keep with me that are roughly 6 inches long. The only use for this is that the tester has only female ends on both sides, so when testing female keystone jacks you need to plug in a male end of a cable to convert it from female to male.
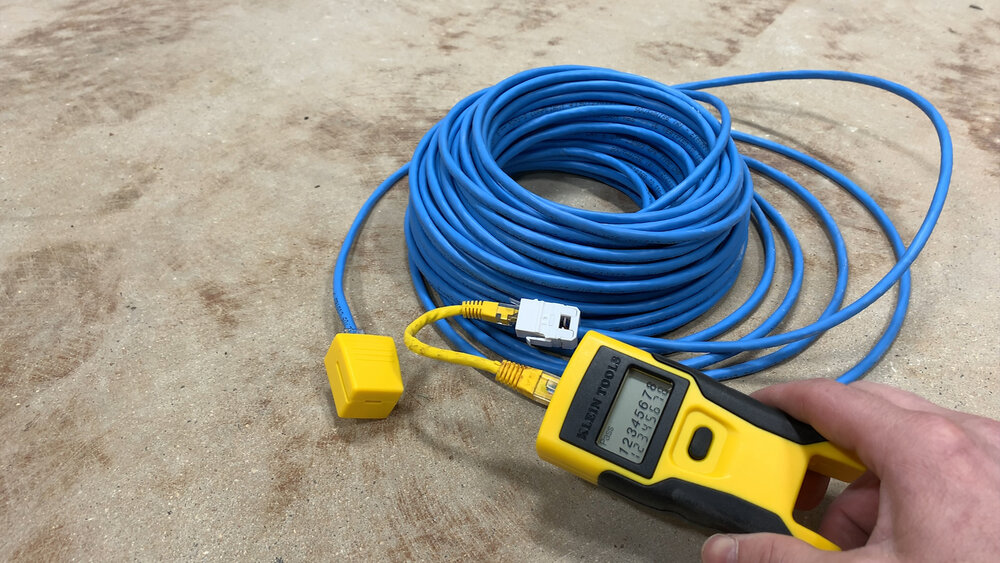
Every network cable tester has a display that tells you either “pass,” “fail,” or “open.” If you get fail or open you know that the termination is not correct, or the terminal is not fully pressed into the tester. A fail gives more precise information, in the tester I’m using it shows the order of the pins and whether or not your numbers match up with the tester’s numbers. If you get a “fail” and any of the pins (for example 1 and 4) are mixed up, the tester will show you which numbers are out of order. When you get a pass the tester also shows you the numbers on top match the numbers on bottom. This means you did everything correctly and you can move on down the road.
Please check out the Electrician U Facebook page and subscribe to the YouTube Channel if you like these videos! Also check out the Electrician U Instagram page.
**Disclaimer - These videos are for training purposes alone, all work done on electrical systems should be done by a licensed and insured electrical contractor. If you are not an electrician, do not attempt any of the work you are seeing in these videos.**
LISTEN TO AUDIO:
51 episodes
Archived series ("Inactive feed" status)
When?
This feed was archived on October 12, 2020 12:11 (
Why? Inactive feed status. Our servers were unable to retrieve a valid podcast feed for a sustained period.
What now? You might be able to find a more up-to-date version using the search function. This series will no longer be checked for updates. If you believe this to be in error, please check if the publisher's feed link below is valid and contact support to request the feed be restored or if you have any other concerns about this.
Manage episode 244087729 series 2309681
Content provided by Dustin Stelzer. All podcast content including episodes, graphics, and podcast descriptions are uploaded and provided directly by Dustin Stelzer or their podcast platform partner. If you believe someone is using your copyrighted work without your permission, you can follow the process outlined here https://player.fm/legal.
In partnership with Rogers - https://www.rogersservices.com
Punching down and testing cat5 cables is something that a lot of people struggle with understanding so today I'm going to talk about what the various category cables are, how to decide if you need A or B configuration, and how to check your terminations with a tester when you're done.
WHAT IS CATEGORY CABLE?
Category 5 cable is probably the most commonly know network cable. It's only one of the many kinds out there, however. There are others like Category 3, Cat 5, Cat 5e, Cat 6, Cat 6a, Cat 7, and even the new Cat 8. Category cables are simply twisted pair cable assemblies that have 4 pairs of conductors - 8 total wires inside. Each pair is color-coded to allow the installer to see which pairs they're dealing with when making terminations.
The colors for terminating are made up of 4 solid colored conductors, and 4 striped. Each solid-colored conductor has a matching color striped conductor that are twisted together with inside of the jacketing. Some of these cables are shielded, and some are unshielded and depending on the environment you’re in you may need to know whether you need one or the other.
Each pair has a specific purpose in how they send and receive signals, and when punching down keystone jacks and crimping RJ45 connectors you need to know the order they're supposed to go to ensure the cables work correctly.
568A or 568B?
Every termination we do nowadays has two options for how the wires can be ordered. The old way of wiring was using the T568A configuration. These days most people use the T568B configuration, and there's a reason for it.
A straight-through cable will have one configuration on both ends of the cable. This means that on one side you'll have A, and the other you'll have A. This allows information to be passed "straight through" the cable for devices that are DIFFERENT than one-another. If you wire for configuration B, the same is true. The reason there are 2 configurations is that there is a type of network cable called a "crossover cable" that needs to be able to be visibly recognized when looking at it. This type of cable has ONE side using an A configuration, while the other has a B configuration. This allows two SIMILAR devices to speak to each other, and listen to each other at the same time.
If you try to use a crossover cable for 2 different devices it will not work, and if you try to use a straight-through cable for 2 similar devices it will not work. Each has their purpose. However, whether or not you use A or B configuration, your cables will still work if you make sure both ends are the same. Crossover cables are very rare and are used specifically by people who know why they're using them. For the average person, wiring a cable with both ends as A, while hooking up to a network that is wired in B is ok. All of the pins will still line up allowing different devices to communicate. It's only a problem when the pins differ on both ends or are punched down/terminated incorrectly.
TERMINATING RJ45 CONNECTORS
An RJ45 connector is the "male" end of a cable that plugs into the "female" keystone jack. An RJ45 has 8 metal pins that pierce the sheathing of the 8 individual wires in the CAT cable assembly. These pins have a specific order that must be followed to ensure they transmit and receive data, otherwise, they won't work or they'll short-out your equipment.
Strip out about 3 inches of jacketing at the end of the cable. Cut off any plastic insulation, or fibers that come on the inside of the cable. Next untwist all of the pairs and straighten them out using something solid. I drag the edge of my strippers down each conductor to remove the curls in each one. Then line each conductor up in either the A or B configuration from LEFT TO RIGHT as they emerge from the jacketing. Next, take your RJ45 connector and measure out how much of the conductors you need, and cut off the excess. You should only need roughly 1/2-inch to 3/8-inch of conductors sticking out of the jacketing. Make sure you don't mix up the order as you're cutting. Then slide the RJ45 connector so the bottom is looking at you. The "TOP" of the RJ45 that has the thumb clip must face down/away from you. Once you've gotten it slid in place, use a crimper to crimp down the connection. This does two things - first it smashes a piece of plastic down on the inside of the connector, which holds the entire connector down on the jacketing. Second it presses each of the 8 pins in to the 8 conductors allowing a connection to occur when the cable is plugged in.
Last thing to do is visually inspect each conductor to make sure that all of the pins are in the correct order, especially on both ends if you have a cable that you’ve just terminated on both sides. Further down in this article we will get to testing which is the most important step in all of this.
TERMINATING KEYSTONE JACKS
To terminate a keystone jack you have to flip it upside down to expose the blades on the bottom. All modern keystones will come with a wiring diagram that shows you which pins to match with which colors for both T568A and T568B terminations. Make sure you keep your eye on which order you’re doing, as sometimes it gets confusing looking at these tiny stickers.
First strip out 3 inches of jacketing from the end of the cable, just like we did on the RJ45 connector above. Untwist the pairs and straighten them out so they’re easier to work with. Lay the conductors across the keystone so that the jacketing is just inside of the connector. This ensures no conductors will become exposed when you finish your terminations.
Next use your punchdown tool to press each conductor into its slot. If you set your punchdown tool to “LOW” it will not punch very hard, and most of the time you’ll have to twist off the ends after you’ve punched them down. If you use “HIGH” the ends will come flying off as you punch them down, so a lot of people like using this setting. If you’re in an environment where you can’t send the ends flying several feet away (above someones clean desk) you may want to stick to low.
After punching down all of the conductors go back and check to make sure you matched the colors up correctly. Then snap the plastic cover on the back side of the connector and voila, you’re done.
TESTING YOUR TERMINATIONS
A single tester can be used to check both RJ45 and keystone terminations. You will need a small patch cord to use if you have a tester that did not come with such jumpers. You can always make a couple of these, I just happen to have a few that I keep with me that are roughly 6 inches long. The only use for this is that the tester has only female ends on both sides, so when testing female keystone jacks you need to plug in a male end of a cable to convert it from female to male.
Every network cable tester has a display that tells you either “pass,” “fail,” or “open.” If you get fail or open you know that the termination is not correct, or the terminal is not fully pressed into the tester. A fail gives more precise information, in the tester I’m using it shows the order of the pins and whether or not your numbers match up with the tester’s numbers. If you get a “fail” and any of the pins (for example 1 and 4) are mixed up, the tester will show you which numbers are out of order. When you get a pass the tester also shows you the numbers on top match the numbers on bottom. This means you did everything correctly and you can move on down the road.
Please check out the Electrician U Facebook page and subscribe to the YouTube Channel if you like these videos! Also check out the Electrician U Instagram page.
**Disclaimer - These videos are for training purposes alone, all work done on electrical systems should be done by a licensed and insured electrical contractor. If you are not an electrician, do not attempt any of the work you are seeing in these videos.**
LISTEN TO AUDIO:
51 episodes
All episodes
×Welcome to Player FM!
Player FM is scanning the web for high-quality podcasts for you to enjoy right now. It's the best podcast app and works on Android, iPhone, and the web. Signup to sync subscriptions across devices.
Similar to Electrician U
Show notes are at https://stevelitchfield.com/sshow/chat.html
…
continue reading
Embedded is the show for people who love gadgets. Making them, breaking them, and everything in between. Weekly interviews with engineers, educators, and enthusiasts. Find the show, blog, and more at embedded.fm.
…
continue reading
Kick off your week every Monday morning by discovering new strategies to dominate your day before breakfast! Join host Jeff Sanders on this practical self-improvement podcast that focuses on productivity, healthy habits, and personal development. This is your home to bounce out of bed with enthusiasm, create powerful lifelong habits, and tackle your grandest goals with extraordinary energy! To join The 5 AM Miracle Community, get email updates, see recommended tools, and dig into the show no ...
…
continue reading
Interesting stories from today’s franchisors and entrepreneurs.
…
continue reading
Survivalist Prepper, all about survival skills, prepping, preparedness and living off the grid without too much “tin foil hat” stuff. Learning how to become more self sufficient when disaster strikes. Stay up to date with the latest prepping news and information like bugging out, prepping and survival gear, and food storage etc.
…
continue reading
1
The Brutal Truth about Sales and Selling - We interview the world's best B2B Enterprise salespeople.
Brian Burns
No BS Allowed - Are you sick of empty suits telling you to work harder? - Learn about The Maverick Selling Method, which models the world's best salespeople and what they do differently. If you are in sales and are passionate about selling, you will like this podcast. The focus is on b2b sales and selling. If you are selling or in sales, this podcast is for you. I cover cold calling, spin selling, challenger sale, solution selling, and advanced selling skills. Strategic selling, LinkedIn, sa ...
…
continue reading
BBC Radio 5 live’s award winning gaming podcast, discussing the world of video games and games culture.
…
continue reading
The London School of Economics and Political Science public events podcast series is a platform for thought, ideas and lively debate where you can hear from some of the world's leading thinkers. Listen to more than 200 new episodes every year.
…
continue reading
Mandarin Chinese Mp3 Audio Lessons, PDF Transcripts, Worksheets, Situational Dialogues and Chinese Character Videos
…
continue reading
Player FM - Podcast App
Go offline with the Player FM app!
Go offline with the Player FM app!