Artwork

Content provided by KFUO Radio. All podcast content including episodes, graphics, and podcast descriptions are uploaded and provided directly by KFUO Radio or their podcast platform partner. If you believe someone is using your copyrighted work without your permission, you can follow the process outlined here https://player.fm/legal.
Player FM - Podcast App
Go offline with the Player FM app!

#162. Unexpected Iron Ladle Challenge: Leftover Halloween Candy!

47:02
 
Share
 

Manage episode 346137339 series 2682014
Content provided by KFUO Radio. All podcast content including episodes, graphics, and podcast descriptions are uploaded and provided directly by KFUO Radio or their podcast platform partner. If you believe someone is using your copyrighted work without your permission, you can follow the process outlined here https://player.fm/legal.

It’s an Iron Ladle Challenge—and this time, the Ladies are solving a culinary problem that may or may not actually exist: What can you do with leftover Halloween candy?

Sarah melts candy corn (and smokes out her kitchen) to make homemade gourmet Butterfinger-style bonbons. Bri goes sugar-free (and also candy-free), decoupaging empty candy wrappers into fun notebook covers. Rachel tries her hand at a from-scratch gingerbread house (featuring banana Laffy-Taffys, jawbusters, and other reject candies)—and burns out the motor in her brand-new hand mixer in the process. And Erin overcomes a kitchen emergency (also involving a hand mixer) to save the day with her sweet and savory late-night-snack cookies.

Scroll down for photos and recipes, and view more photos at instagram.com/lutheranladieslounge.

Candy Corn Peanut Butter Bars

Sarah's Candy Corn Peanut Butter Bars (aka Butterfingers)

from thespruceeats.com/candy-corn-peanut-butter-bars-520932

Prep: 10 mins

Cook: 20 mins

Total: 30 mins

Servings: 16 servings

Ingredients

3 cups candy corn

1 1/2 cups creamy peanut butter, not the natural variety

12 ounces chocolate candy coating

Instructions

Gather the ingredients.

Line an 8x8 pan with foil and spray the foil with nonstick cooking spray. Place the candy corn in a large microwave-safe bowl.

Microwave the candy corn for one minute, then stir as it starts to melt. Continue to microwave the corn in 30-second increments, stirring after every 30 seconds to prevent overheating. Cook the candy corn until it is completely melted and smooth, but be wary of overheating it and causing it to stiffen up.

Add the peanut butter to the melted candy corn and stir it in until it is completely incorporated. If you have trouble combining them, microwave the candy briefly (for 10 to 15 seconds at a time) just until it's warm enough to be easily mixed.

Scrape the candy out into the prepared pan and smooth it into an even layer. While it is still warm, use a knife or pizza cutter to score it into small bars, 1 inch across and 4 inches long. You should get about 16 small bars from one batch, but you can always make them larger or smaller as desired. Let the candy cool completely.

Once cool, break or cut the bars apart along the scored lines. Melt the chocolate candy coating in a microwave-safe bowl, stirring frequently until it is melted and smooth.

Use forks or dipping tools to dip the bars completely in the coating. Once a bar has been dipped, hold it over the bowl to let the excess drip back down into the bowl. Place a dipped bar on a parchment-lined baking sheet, and repeat until all of the bars are dipped. Let them set completely at room temperature or in the refrigerator before serving.

When served at room temperature, the bars have a slight chew to them, but when refrigerated they're perfectly crispy and crunchy. Store candy corn peanut butter bars in an airtight container in the refrigerator for up to a month.
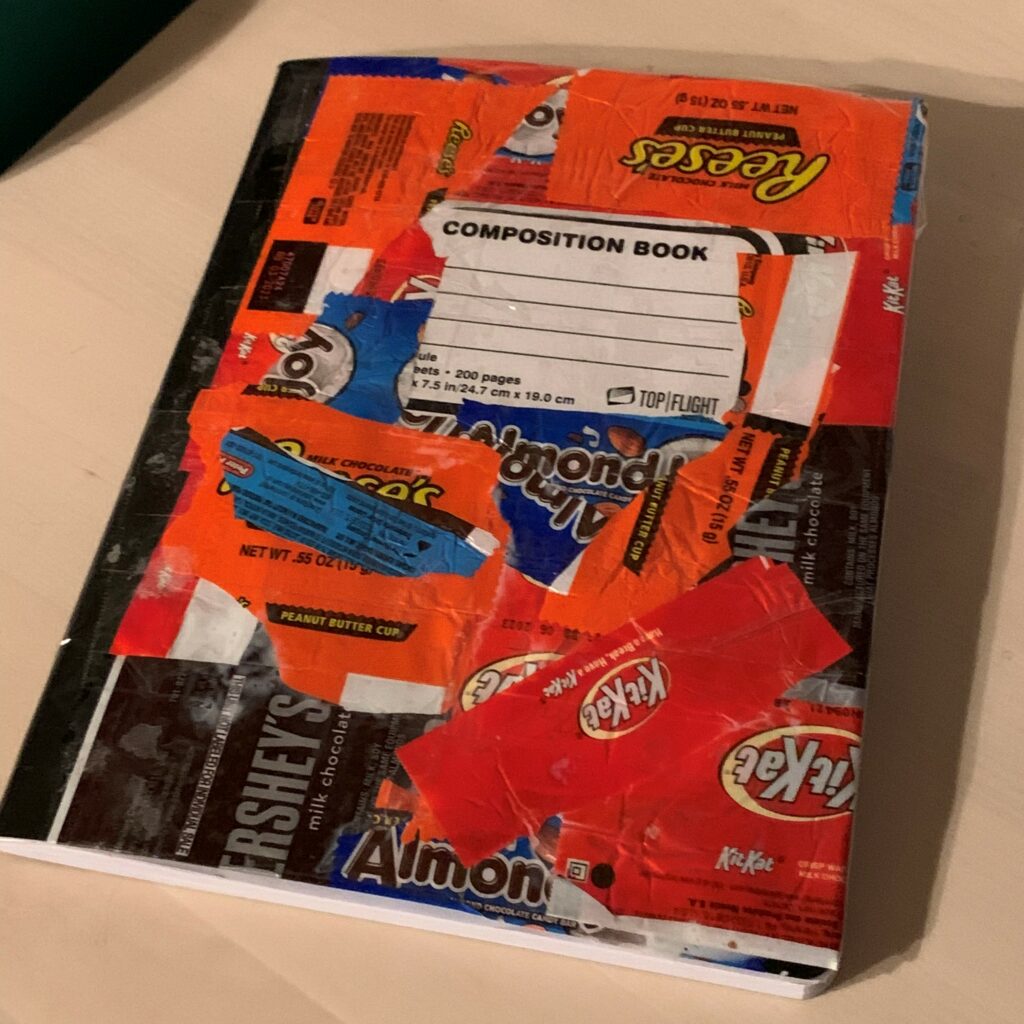
Bri's Candy Wrapper Notebook

Honestly there are no rules on this, but here are some directions/tips to get you started:

  • Choose your surface! Can be a composition notebook, a journal, a canvas, a piece of MDF. Sky’s the limit. (Not really but I’m sure you get it.)
  • Gather your other materials for your collage: leftover Halloween candy wrappers, a preferred adhesive (Schelmer’s School Glue(tm), Schmod Podge(tm) or similar), and your preferred finisher (varnish, artist’s fixative, etc.)
  • NOTE: Choose wrappers or parts of wrappers that lay flat and don’t easily “ribbon” or roll in on itself — unless you want to flatten those wrappers ahead of time. Otherwise, paper- and/or wax-based are probably best. Cardboard would also work!
  • NOTE: When choosing a finisher, make sure it is workable and has the desired level of “sheen” you want (matte v. glossy). When in doubt, just use clear packing tape. I won’t tell Martha Stewart.
  • Adhere the wrappers to the surface using the chosen adhesive. You can create a pattern, or use my preferred method (perhaps unsurprisingly), a free-for-all style.
  • NOTE: Although a collage is technically two-dimensional art, you may want to plan different “layers” to your project.
  • Ok, my style isn’t 100% free-for-all. My first layer is always the “background layer” when I want to ensure the entire surface is covered with my collage medium. From there, I build upon that layer in terms of what I want to be visible. (E.g., If you want to make sure a certain color or brand or aesthetic predominates in your collage, make sure those wrappers compose your final layer of the collage or at least are some of the last wrappers you glue onto your surface.)
  • When all of your wrappers have been arranged and adhered to your surface, you’re ready to apply varnish, a fixative or (again, seriously) clear packing tape to finish your artwork. Please follow the manufacturer’s instructions on whichever finisher you choose so that you don’t melt your skin off on contact or something!!

Erin's Friday Afternoon Snack Cookies

Late Night Snack Cookies from cookiesandcups.com/late-night-snack-cookies

makes 24 large cookies

Ingredients

1 cup butter, room temperature

1 1/4 cups light brown sugar

1 egg + 1 yolk

1 Tbsp heavy cream or milk

1 Tbsp vanilla

2 1/2 cups flour

1 tsp baking soda

1/2 tsp salt

3 cups chopped Snickers candy, frozen

4–5 cups thick cut salted potato chips (I used Kettle Chips)

Instructions

Preheat oven to 350°

Line baking sheet with parchment paper, set aside.

In bowl of stand mixer cream butter and sugar for 2 minutes until light and fluffy.

Turn mixer to low and add in egg, yolk, milk and vanilla. Increase speed to medium and mix until smooth and incorporated.

Turn mixer back down to low and add in flour, baking soda and salt, mixing until combined.

Add in Snickers candy and mix until evenly distributed. And finally add in potato chips and pulse until combined. Don’t over mix, as all the chips will break up too much.

Drop by heaping tablespoon onto lined baking sheet and bake 9-10 minutes until edges are golden. Allow to cool 2-3 minutes on baking sheet and transfer to a wire rack to continue cooling.

Notes

store airtight for up to 3 days.

Rachel’s Gingerbread House of Reject Candy

from simplyrecipes.com/recipes/how_to_make_a_gingerbread_house

Prep Time 2 hrs

Cook Time 15 mins

Total Time 2 hrs 15 mins

Servings 12

Yield 1 gingerbread house

With 6 cups of flour, how you measure the flour makes a difference. Lightly fluff up the flour in the container, use a cup measure to scoop up flour, then use a blunt knife to level the flour. Do not pack or tamp down the flour in the cup.

These instructions were adapted from those found in the 1996 Joy of Cooking.

Ingredients

For the gingerbread house dough

  • 6 cups (828g) all-purpose flour, plus more for rolling the dough (see recipe note)
  • 1/2 teaspoon baking powder
  • 4 teaspoons ground ginger
  • 4 teaspoons ground cinnamon
  • 1/2 teaspoon ground cloves or allspice
  • 1/2 teaspoon salt
  • 3/4 cup (170g) butter, softened
  • 1 1/2 cups (284g) packed light brown sugar
  • 2 large eggs
  • 1 cup molasses
  • 1 tablespoon water

For the royal icing

  • 2 large egg whites
  • 2 2/3 cups powdered sugar, divided

Special Equipment

  • Stand mixer
  • Piping bag or freezer bag

Method

Make the Gingerbread Dough

  1. Whisk the flour and spices:
  2. In a large bowl, whisk together the flour, baking powder, ginger, cinnamon, cloves or allspice, and salt. Set aside.
  3. Make the butter, sugar, egg, and molasses mixture:
  4. Using a stand mixer fitted with the paddle attachment, beat the butter and brown sugar on medium speed until fluffy and well blended. Beat in the eggs, molasses, and water until well combined.
  5. Combine the wet and dry ingredients, and knead the dough:
  6. Beat half of the flour mixture into the molasses mixture until well blended and smooth. Add in the remaining flour and continue to mix until well blended and a soft cohesive dough forms.
  7. Turn the dough out onto a slightly floured work surface and knead by hand 5 or 6 times until the dough is smooth and combined. If dough is too soft, add a little more flour.
  8. Divide the dough, wrap and chill it:
  9. Divide the dough in half, pat into disks, and wrap each half in plastic wrap. Refrigerate for at least two hours, preferably overnight.
  10. You can make it up to 3 days ahead of time. Let sit at room temperature for at least 10 minutes before rolling out.

Make the Gingerbread House Pieces

  1. Create and cut out the pattern pieces:
  2. Create a gingerbread house pattern by cutting out pieces from our printable Gingerbread House Templates. They should print out with the correct proportions (1 inch on the pattern = 1 inch in real life), but if not, the dimensions are also given on the pattern so you can use a ruler and create your own.
  3. You can either use the regular paper template pieces as-is or, if you prefer, you can trace the pieces onto stiffer paper like a manila folder or cardboard. I like cardboard because it's almost as thick as the gingerbread house pieces will be, and you can create a house model easily using the pieces.
  4. Prepare the oven and cookie sheets:
  5. Preheat oven to 350°F, with the oven rack in the middle. Have 2 to 3 flat cookie sheets ready.
  6. Roll out the dough:
  7. Spread parchment paper on a large flat surface for rolling. Dust the paper lightly with flour.
  8. Working with one portion of the dough at a time, use a rolling pin to roll out the dough to an even thickness of 1/4 inch. Add a little flour to the surface of the dough, and check for sticking as you roll it out.
  9. If it sticks to either your rolling pin or the rolling surface, dust with more flour. If the rolled out dough is very soft, you may want to freeze it for an hour before cutting out the patterns.
  10. Cut out shapes in the dough with pattern pieces:
  11. Rub a little flour over the surface of the dough. Place the pattern pieces on the dough, as many pattern pieces as will fit on the dough. Use a small sharp knife to cut out the pattern pieces from the dough, wiping the knife surface clean frequently.
  12. Depending on how soft the dough is, you may need to use scissors to cut the parchment paper. You can cut out the patterns through the dough and parchment paper, placing the dough pieces with the paper directly on the cookie sheets.
  13. If you are not using parchment paper, you may need to use a large metal spatula to transfer the dough pieces to a greased cookie sheet.
  14. Space the pieces on the cookie sheet an inch apart from each other. If dough pieces stretch during the transfer process, push them back into shape.
  15. You can cut out a door and window(s) at this point, or you can wait until after baking, soon after the pieces have come out of the oven while the cookies are still warm.
  16. Bake:
  17. Bake in a 350°F oven until the edges are just beginning to darken, 11-15 minutes for the large pieces, 6 to 8 minutes for the small pieces.
  18. Rotate the cookie sheets halfway through the baking for more even browning. Remove the sheets to racks to cool, about 15 minutes.
  19. Trim the pieces while warm:
  20. While the pieces are still slightly warm, lay the pattern pieces over them and use a large straight chef's knife to trim off any parts of the pieces that have through cooking spread beyond the pattern.
  21. Remove pieces to cool directly on racks to cool completely.

Make the Royal Icing

  1. Make the royal icing:
  2. Whisk the egg whites and 1 1/3 cups of the powdered sugar together until smooth .
  3. If you are planning to eat your gingerbread house and are concerned about the safety of raw eggs, you can cook the egg white powdered sugar mixture in a double boiler until the mixture reaches a temperature of 160°F, but not higher than 175° (for more information, read How to Pasteurize Eggs at Home). You can also use pasteurized dried or liquid egg whites.
  4. Add more powdered sugar, beat to stiff peaks:
  5. Add the remaining 1 1/3 cup of powdered sugar to the sugar egg mixture. Using an electric mixer, beat on high speed until the icing holds stiff peaks. If it doesn't form stiff peaks, add more powdered sugar.
  6. Place a dampened clean towel over the bowl of royal icing:
  7. Keep this towel over the icing to prevent it from drying out while you work with it.
  8. Pipe the icing with a pastry bag or cut freezer bag:
  9. When you are ready to mortar or decorate, fill a pastry bag with the icing. If you don't have a pastry bag, you can make your own with a re-sealable plastic freezer bag, just cut off the tip (a small cut) of one of the corners of the bag. Plastic or metal piping tips are available in supermarkets which you can also use with a freezer bag, for more controlled piping.

Build the House Using Royal Icing as Mortar

This is where it really helps to have more than two hands working on a house, and why making a gingerbread house is so much more fun with company than alone. If you are working on this alone, it may help to grab some canned goods from the pantry and use the cans to help prop up the pieces while the icing mortar is drying.

  1. Pick and line a base:
  2. Pick a solid base for your gingerbread house - either a flat cookie sheet, or a thick, sturdy piece of cardboard. If you want, line the base with aluminum foil or wax paper.
  3. Mortar the sides of the house with royal icing:
  4. Pipe a thick line of icing along a short end of one of the side pieces. Press the iced side piece against the edge of either the front or back pieces.
  5. Hold in place for a few minutes until the icing is partially set. Repeat with the other side piece. Prop up with cans if necessary.
  6. Repeat with the other short edges of the side pieces and the remaining front/back piece.
  7. Pipe icing along the seams, inside and outside of the house, to fill in any gaps and to add extra stability. Pipe icing along the edges of the house where it meets the base.
  8. Let set for at least an hour before attempting to add the roof pieces.
  9. Simple Tip!
  10. If any of the gingerbread house pattern pieces break, as can happen easily when working with what are essentially cookies, most likely you can repair them.
  11. On my house I forgot to cut out the door and window until the front piece had almost completely cooled. When I went to make the cuts, the piece broke. Fortunately, it was easy to mortar back together with royal icing.
  12. We even created a "splint" out of cardboard and used royal icing to hold the splint to the piece. Let harden completely before using the piece for the house construction. When it comes time to decorate, you can pipe icing right over the broken seam and no one will be the wiser.
  13. Mortar in the roof with royal icing:
  14. Once the royal icing has dried enough so that the base structure is solid, you can go to work on the roof. Pipe icing all along the top edges of the structure, front and back and two sides.
  15. The roof pieces are rectangular-shaped. Place the roof pieces so that the long ends of the rectangle are running along the top of the house.
  16. It helps if you have two people working together to place the roof pieces on the house at the same time so that they meet easily at the top center, and extend out a little bit, forming an overhang at each end.
  17. Gently hold the roof pieces in place for a few minutes until they are set enough so they don't slide off when you remove your hands.
  18. Pipe the top seam of the house with extra icing. Let the house stand for at least an hour, and preferably 8 hours before decorating.
  19. Mortar the chimney with royal icing:
  20. The dimensions of the chimney can be a bit tricky because of the angle of the roof.
  21. It's easiest to assemble the chimney first upside down, separate from the house. Pipe the pieces together with royal icing and let set until stable.
  22. Then, turn the chimney right-side-up and attach it to the roof using piped royal icing. You can do this either right after the house has initially set (1 hour after assembly) or later, during the decorating process.
  23. Decorate the house:
  24. Decorate your gingerbread house with piped royal icing and candies such as red hots, gum drops, candy canes, chocolate truffles, or whatever you like.

Connect with the Lutheran Ladies on social media in The Lutheran Ladies’ Lounge Facebook discussion group (facebook.com/groups/LutheranLadiesLounge) and on Instagram @lutheranladieslounge. Follow Sarah (@hymnnerd), Rachel (@rachbomberger), Erin (@erinaltered), and Bri (@grrrzevske) on Instagram!

Sign up for the Lutheran Ladies' Lounge monthly e-newsletter here, and email the Ladies at lutheranladies@kfuo.org.

  continue reading

290 episodes

Artwork
iconShare
 
Manage episode 346137339 series 2682014
Content provided by KFUO Radio. All podcast content including episodes, graphics, and podcast descriptions are uploaded and provided directly by KFUO Radio or their podcast platform partner. If you believe someone is using your copyrighted work without your permission, you can follow the process outlined here https://player.fm/legal.

It’s an Iron Ladle Challenge—and this time, the Ladies are solving a culinary problem that may or may not actually exist: What can you do with leftover Halloween candy?

Sarah melts candy corn (and smokes out her kitchen) to make homemade gourmet Butterfinger-style bonbons. Bri goes sugar-free (and also candy-free), decoupaging empty candy wrappers into fun notebook covers. Rachel tries her hand at a from-scratch gingerbread house (featuring banana Laffy-Taffys, jawbusters, and other reject candies)—and burns out the motor in her brand-new hand mixer in the process. And Erin overcomes a kitchen emergency (also involving a hand mixer) to save the day with her sweet and savory late-night-snack cookies.

Scroll down for photos and recipes, and view more photos at instagram.com/lutheranladieslounge.

Candy Corn Peanut Butter Bars

Sarah's Candy Corn Peanut Butter Bars (aka Butterfingers)

from thespruceeats.com/candy-corn-peanut-butter-bars-520932

Prep: 10 mins

Cook: 20 mins

Total: 30 mins

Servings: 16 servings

Ingredients

3 cups candy corn

1 1/2 cups creamy peanut butter, not the natural variety

12 ounces chocolate candy coating

Instructions

Gather the ingredients.

Line an 8x8 pan with foil and spray the foil with nonstick cooking spray. Place the candy corn in a large microwave-safe bowl.

Microwave the candy corn for one minute, then stir as it starts to melt. Continue to microwave the corn in 30-second increments, stirring after every 30 seconds to prevent overheating. Cook the candy corn until it is completely melted and smooth, but be wary of overheating it and causing it to stiffen up.

Add the peanut butter to the melted candy corn and stir it in until it is completely incorporated. If you have trouble combining them, microwave the candy briefly (for 10 to 15 seconds at a time) just until it's warm enough to be easily mixed.

Scrape the candy out into the prepared pan and smooth it into an even layer. While it is still warm, use a knife or pizza cutter to score it into small bars, 1 inch across and 4 inches long. You should get about 16 small bars from one batch, but you can always make them larger or smaller as desired. Let the candy cool completely.

Once cool, break or cut the bars apart along the scored lines. Melt the chocolate candy coating in a microwave-safe bowl, stirring frequently until it is melted and smooth.

Use forks or dipping tools to dip the bars completely in the coating. Once a bar has been dipped, hold it over the bowl to let the excess drip back down into the bowl. Place a dipped bar on a parchment-lined baking sheet, and repeat until all of the bars are dipped. Let them set completely at room temperature or in the refrigerator before serving.

When served at room temperature, the bars have a slight chew to them, but when refrigerated they're perfectly crispy and crunchy. Store candy corn peanut butter bars in an airtight container in the refrigerator for up to a month.

Bri's Candy Wrapper Notebook

Honestly there are no rules on this, but here are some directions/tips to get you started:

  • Choose your surface! Can be a composition notebook, a journal, a canvas, a piece of MDF. Sky’s the limit. (Not really but I’m sure you get it.)
  • Gather your other materials for your collage: leftover Halloween candy wrappers, a preferred adhesive (Schelmer’s School Glue(tm), Schmod Podge(tm) or similar), and your preferred finisher (varnish, artist’s fixative, etc.)
  • NOTE: Choose wrappers or parts of wrappers that lay flat and don’t easily “ribbon” or roll in on itself — unless you want to flatten those wrappers ahead of time. Otherwise, paper- and/or wax-based are probably best. Cardboard would also work!
  • NOTE: When choosing a finisher, make sure it is workable and has the desired level of “sheen” you want (matte v. glossy). When in doubt, just use clear packing tape. I won’t tell Martha Stewart.
  • Adhere the wrappers to the surface using the chosen adhesive. You can create a pattern, or use my preferred method (perhaps unsurprisingly), a free-for-all style.
  • NOTE: Although a collage is technically two-dimensional art, you may want to plan different “layers” to your project.
  • Ok, my style isn’t 100% free-for-all. My first layer is always the “background layer” when I want to ensure the entire surface is covered with my collage medium. From there, I build upon that layer in terms of what I want to be visible. (E.g., If you want to make sure a certain color or brand or aesthetic predominates in your collage, make sure those wrappers compose your final layer of the collage or at least are some of the last wrappers you glue onto your surface.)
  • When all of your wrappers have been arranged and adhered to your surface, you’re ready to apply varnish, a fixative or (again, seriously) clear packing tape to finish your artwork. Please follow the manufacturer’s instructions on whichever finisher you choose so that you don’t melt your skin off on contact or something!!

Erin's Friday Afternoon Snack Cookies

Late Night Snack Cookies from cookiesandcups.com/late-night-snack-cookies

makes 24 large cookies

Ingredients

1 cup butter, room temperature

1 1/4 cups light brown sugar

1 egg + 1 yolk

1 Tbsp heavy cream or milk

1 Tbsp vanilla

2 1/2 cups flour

1 tsp baking soda

1/2 tsp salt

3 cups chopped Snickers candy, frozen

4–5 cups thick cut salted potato chips (I used Kettle Chips)

Instructions

Preheat oven to 350°

Line baking sheet with parchment paper, set aside.

In bowl of stand mixer cream butter and sugar for 2 minutes until light and fluffy.

Turn mixer to low and add in egg, yolk, milk and vanilla. Increase speed to medium and mix until smooth and incorporated.

Turn mixer back down to low and add in flour, baking soda and salt, mixing until combined.

Add in Snickers candy and mix until evenly distributed. And finally add in potato chips and pulse until combined. Don’t over mix, as all the chips will break up too much.

Drop by heaping tablespoon onto lined baking sheet and bake 9-10 minutes until edges are golden. Allow to cool 2-3 minutes on baking sheet and transfer to a wire rack to continue cooling.

Notes

store airtight for up to 3 days.

Rachel’s Gingerbread House of Reject Candy

from simplyrecipes.com/recipes/how_to_make_a_gingerbread_house

Prep Time 2 hrs

Cook Time 15 mins

Total Time 2 hrs 15 mins

Servings 12

Yield 1 gingerbread house

With 6 cups of flour, how you measure the flour makes a difference. Lightly fluff up the flour in the container, use a cup measure to scoop up flour, then use a blunt knife to level the flour. Do not pack or tamp down the flour in the cup.

These instructions were adapted from those found in the 1996 Joy of Cooking.

Ingredients

For the gingerbread house dough

  • 6 cups (828g) all-purpose flour, plus more for rolling the dough (see recipe note)
  • 1/2 teaspoon baking powder
  • 4 teaspoons ground ginger
  • 4 teaspoons ground cinnamon
  • 1/2 teaspoon ground cloves or allspice
  • 1/2 teaspoon salt
  • 3/4 cup (170g) butter, softened
  • 1 1/2 cups (284g) packed light brown sugar
  • 2 large eggs
  • 1 cup molasses
  • 1 tablespoon water

For the royal icing

  • 2 large egg whites
  • 2 2/3 cups powdered sugar, divided

Special Equipment

  • Stand mixer
  • Piping bag or freezer bag

Method

Make the Gingerbread Dough

  1. Whisk the flour and spices:
  2. In a large bowl, whisk together the flour, baking powder, ginger, cinnamon, cloves or allspice, and salt. Set aside.
  3. Make the butter, sugar, egg, and molasses mixture:
  4. Using a stand mixer fitted with the paddle attachment, beat the butter and brown sugar on medium speed until fluffy and well blended. Beat in the eggs, molasses, and water until well combined.
  5. Combine the wet and dry ingredients, and knead the dough:
  6. Beat half of the flour mixture into the molasses mixture until well blended and smooth. Add in the remaining flour and continue to mix until well blended and a soft cohesive dough forms.
  7. Turn the dough out onto a slightly floured work surface and knead by hand 5 or 6 times until the dough is smooth and combined. If dough is too soft, add a little more flour.
  8. Divide the dough, wrap and chill it:
  9. Divide the dough in half, pat into disks, and wrap each half in plastic wrap. Refrigerate for at least two hours, preferably overnight.
  10. You can make it up to 3 days ahead of time. Let sit at room temperature for at least 10 minutes before rolling out.

Make the Gingerbread House Pieces

  1. Create and cut out the pattern pieces:
  2. Create a gingerbread house pattern by cutting out pieces from our printable Gingerbread House Templates. They should print out with the correct proportions (1 inch on the pattern = 1 inch in real life), but if not, the dimensions are also given on the pattern so you can use a ruler and create your own.
  3. You can either use the regular paper template pieces as-is or, if you prefer, you can trace the pieces onto stiffer paper like a manila folder or cardboard. I like cardboard because it's almost as thick as the gingerbread house pieces will be, and you can create a house model easily using the pieces.
  4. Prepare the oven and cookie sheets:
  5. Preheat oven to 350°F, with the oven rack in the middle. Have 2 to 3 flat cookie sheets ready.
  6. Roll out the dough:
  7. Spread parchment paper on a large flat surface for rolling. Dust the paper lightly with flour.
  8. Working with one portion of the dough at a time, use a rolling pin to roll out the dough to an even thickness of 1/4 inch. Add a little flour to the surface of the dough, and check for sticking as you roll it out.
  9. If it sticks to either your rolling pin or the rolling surface, dust with more flour. If the rolled out dough is very soft, you may want to freeze it for an hour before cutting out the patterns.
  10. Cut out shapes in the dough with pattern pieces:
  11. Rub a little flour over the surface of the dough. Place the pattern pieces on the dough, as many pattern pieces as will fit on the dough. Use a small sharp knife to cut out the pattern pieces from the dough, wiping the knife surface clean frequently.
  12. Depending on how soft the dough is, you may need to use scissors to cut the parchment paper. You can cut out the patterns through the dough and parchment paper, placing the dough pieces with the paper directly on the cookie sheets.
  13. If you are not using parchment paper, you may need to use a large metal spatula to transfer the dough pieces to a greased cookie sheet.
  14. Space the pieces on the cookie sheet an inch apart from each other. If dough pieces stretch during the transfer process, push them back into shape.
  15. You can cut out a door and window(s) at this point, or you can wait until after baking, soon after the pieces have come out of the oven while the cookies are still warm.
  16. Bake:
  17. Bake in a 350°F oven until the edges are just beginning to darken, 11-15 minutes for the large pieces, 6 to 8 minutes for the small pieces.
  18. Rotate the cookie sheets halfway through the baking for more even browning. Remove the sheets to racks to cool, about 15 minutes.
  19. Trim the pieces while warm:
  20. While the pieces are still slightly warm, lay the pattern pieces over them and use a large straight chef's knife to trim off any parts of the pieces that have through cooking spread beyond the pattern.
  21. Remove pieces to cool directly on racks to cool completely.

Make the Royal Icing

  1. Make the royal icing:
  2. Whisk the egg whites and 1 1/3 cups of the powdered sugar together until smooth .
  3. If you are planning to eat your gingerbread house and are concerned about the safety of raw eggs, you can cook the egg white powdered sugar mixture in a double boiler until the mixture reaches a temperature of 160°F, but not higher than 175° (for more information, read How to Pasteurize Eggs at Home). You can also use pasteurized dried or liquid egg whites.
  4. Add more powdered sugar, beat to stiff peaks:
  5. Add the remaining 1 1/3 cup of powdered sugar to the sugar egg mixture. Using an electric mixer, beat on high speed until the icing holds stiff peaks. If it doesn't form stiff peaks, add more powdered sugar.
  6. Place a dampened clean towel over the bowl of royal icing:
  7. Keep this towel over the icing to prevent it from drying out while you work with it.
  8. Pipe the icing with a pastry bag or cut freezer bag:
  9. When you are ready to mortar or decorate, fill a pastry bag with the icing. If you don't have a pastry bag, you can make your own with a re-sealable plastic freezer bag, just cut off the tip (a small cut) of one of the corners of the bag. Plastic or metal piping tips are available in supermarkets which you can also use with a freezer bag, for more controlled piping.

Build the House Using Royal Icing as Mortar

This is where it really helps to have more than two hands working on a house, and why making a gingerbread house is so much more fun with company than alone. If you are working on this alone, it may help to grab some canned goods from the pantry and use the cans to help prop up the pieces while the icing mortar is drying.

  1. Pick and line a base:
  2. Pick a solid base for your gingerbread house - either a flat cookie sheet, or a thick, sturdy piece of cardboard. If you want, line the base with aluminum foil or wax paper.
  3. Mortar the sides of the house with royal icing:
  4. Pipe a thick line of icing along a short end of one of the side pieces. Press the iced side piece against the edge of either the front or back pieces.
  5. Hold in place for a few minutes until the icing is partially set. Repeat with the other side piece. Prop up with cans if necessary.
  6. Repeat with the other short edges of the side pieces and the remaining front/back piece.
  7. Pipe icing along the seams, inside and outside of the house, to fill in any gaps and to add extra stability. Pipe icing along the edges of the house where it meets the base.
  8. Let set for at least an hour before attempting to add the roof pieces.
  9. Simple Tip!
  10. If any of the gingerbread house pattern pieces break, as can happen easily when working with what are essentially cookies, most likely you can repair them.
  11. On my house I forgot to cut out the door and window until the front piece had almost completely cooled. When I went to make the cuts, the piece broke. Fortunately, it was easy to mortar back together with royal icing.
  12. We even created a "splint" out of cardboard and used royal icing to hold the splint to the piece. Let harden completely before using the piece for the house construction. When it comes time to decorate, you can pipe icing right over the broken seam and no one will be the wiser.
  13. Mortar in the roof with royal icing:
  14. Once the royal icing has dried enough so that the base structure is solid, you can go to work on the roof. Pipe icing all along the top edges of the structure, front and back and two sides.
  15. The roof pieces are rectangular-shaped. Place the roof pieces so that the long ends of the rectangle are running along the top of the house.
  16. It helps if you have two people working together to place the roof pieces on the house at the same time so that they meet easily at the top center, and extend out a little bit, forming an overhang at each end.
  17. Gently hold the roof pieces in place for a few minutes until they are set enough so they don't slide off when you remove your hands.
  18. Pipe the top seam of the house with extra icing. Let the house stand for at least an hour, and preferably 8 hours before decorating.
  19. Mortar the chimney with royal icing:
  20. The dimensions of the chimney can be a bit tricky because of the angle of the roof.
  21. It's easiest to assemble the chimney first upside down, separate from the house. Pipe the pieces together with royal icing and let set until stable.
  22. Then, turn the chimney right-side-up and attach it to the roof using piped royal icing. You can do this either right after the house has initially set (1 hour after assembly) or later, during the decorating process.
  23. Decorate the house:
  24. Decorate your gingerbread house with piped royal icing and candies such as red hots, gum drops, candy canes, chocolate truffles, or whatever you like.

Connect with the Lutheran Ladies on social media in The Lutheran Ladies’ Lounge Facebook discussion group (facebook.com/groups/LutheranLadiesLounge) and on Instagram @lutheranladieslounge. Follow Sarah (@hymnnerd), Rachel (@rachbomberger), Erin (@erinaltered), and Bri (@grrrzevske) on Instagram!

Sign up for the Lutheran Ladies' Lounge monthly e-newsletter here, and email the Ladies at lutheranladies@kfuo.org.

  continue reading

290 episodes

All episodes

×
 
Loading …

Welcome to Player FM!

Player FM is scanning the web for high-quality podcasts for you to enjoy right now. It's the best podcast app and works on Android, iPhone, and the web. Signup to sync subscriptions across devices.


Quick Reference Guide